'What you do speaks so loudly, I can't hear what you say.'
Ralph Waldo Emerson

Monday 25 May 2020

This week, we're
Going Round in Circles
This is my final week in the Designer Spotlight. 
It's been such an honour to be invited and so much fun. 
Thank you so much SSS Monday, for having me and making me welcome 😊
This A5 journal page came from thinking about the current situation, and how even though some of us may feel isolated and alone at the moment, it's not the case - and it won't last forever. I'm a very 'touchy feely' person and enjoy a good hug. That's probably what I miss most - hugging friends and family. I seem to spend hours queuing outside supermarkets, mainly for other people and usually in silence - surrounded by people wearing masks, hiding their expressions, and very few people chatting. There's no physical contact at all. Everyday life feels cold, alien and very surreal.
The colours I chose reflect the way I was feeling when at the time I created this. 
I used Hickory Smoke and Spun Sugar (for hope) Distress Oxides, spritzed with water, to create the smooshed background. 
Playing around with the stamps I'd chosen (Inky Antics Muse News (designed by Andrea), Visible Image You Are Not Alone, Creative Chaos and Total Chaos) I first stamped the flower twice in Hickory Smoke, to give the illusion of fading into the background. 
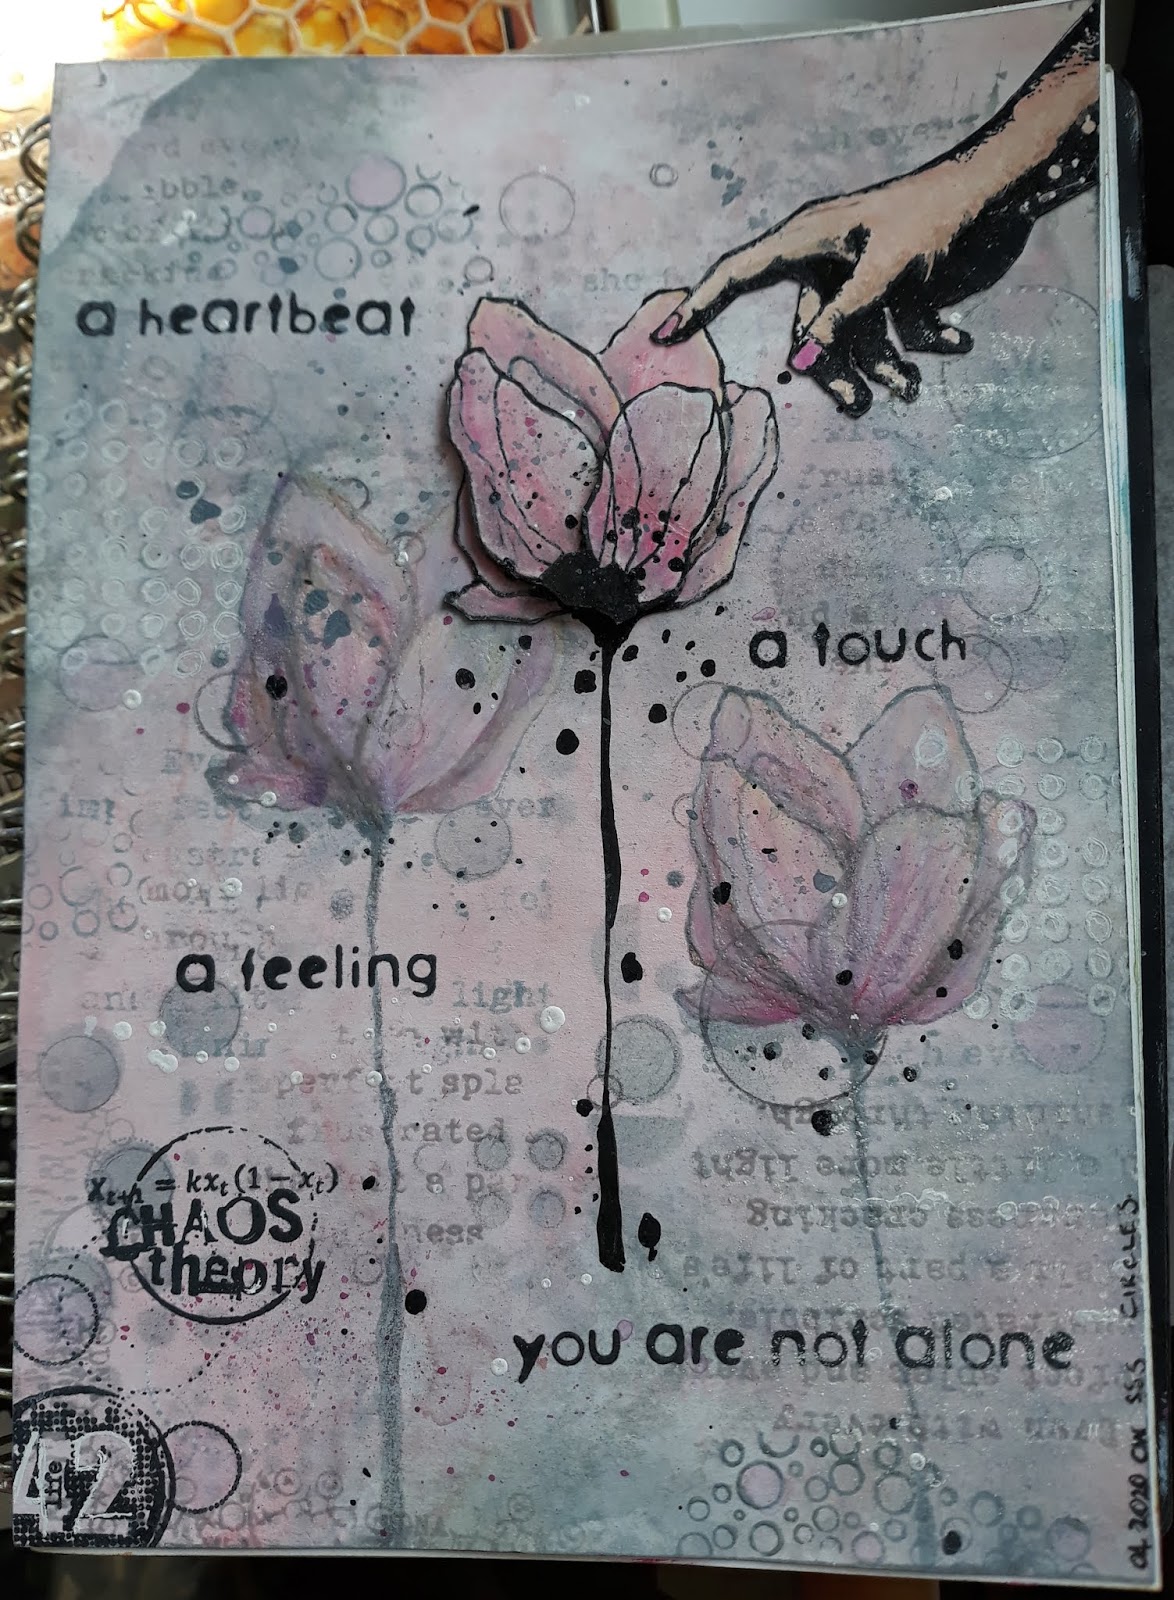
Next, I stamped the text from Inky Antics Muse News a few times in Hickory Smoke, only inking up random parts of the stamp. (I even accidentally stamped it upside down in one place but I left it because I thought it was a good illustration of the strange situation we're all in 😉). I love these words and often use them as a background element, but they seemed to be particularly appropriate for this moment in time.
After adding lots of circles with the Aall and Create stencil, outlining some of them in grey pencil, I stamped random circles from the stamp sets until I was happy with the way it looked.
Having added pale colour to the flowers with Spun Sugar ink and pencils, I stamped the flower again in Versafine Onyx Black, then clear embossed the whole thing. I love the fact that the Oxides caught the Embossing powder in the wettest places, but not everywhere, giving a bit more randomness.
Stamping the flower a couple of times onto scrap card, I cut both out after embossing and coloured the same way, adding more depth of colour, to make them stand out. I usually extend the stem to fit my page, but this time I wanted them to be 'floating'. I stuck the flower head in place, then cut out the front petals on the second image, adding them with foam tape to make the flower stand out more.  

After I'd stamped, coloured and cut out the hand, I attached it so the finger was touching a petal, then added the extra stamping, using images and words from the Visible Image stamp sets. 

I then played around with pencils and a white gel pen, adding light and shade where I thought it was needed, and finishing off with some ink and paint spattering. I also randomly stamped the words again in white acrylic paint, only adding light touches. 
I love stamping and have really enjoyed this month's challenges, but I think this may be the one I enjoyed most, maybe because I just followed my imagination and the way I was feeling. Journalling can be cathartic 😊
I hope you'll join us in this final May challenge. 
Just link your Going Round in Circles art here and you'll be entered into the draw for a $25 voucher to spend at Simon Says Stamp. Yay!
They carry an amazing range of stamps and supplies and are happy to ship internationally.
Supplies used:-
Distress Oxides, Hickory Smoke, Spun Sugar
Aall and Create Totally Dotty A4 stencil
(Click on any of the photos to enlarge)

Linking to:
Sweet Stampin, Anything but a Square
Artistic Stamper, Journalling
Creatalicious, ATG with optional Pink/Purple
More Mixed Media, ATG with optional Pink

Thanks so much for calling in today
Back soon
Stay safe and God bless you!
Cath
xxx

Thursday 21 May 2020

The challenge at Day of the Month Card Club for May is Frog Jumping Day... I don't have a jumping frog stamp, but I do have one who's poised to jump if someone doesn't kiss him quickly 😊
I really wanted to add some funny words, but in the end my mind was a blank, so I just used the usual 'Ribbit' from the stamp set. 
It's a small card but at least I finally managed to get one linked to the Day of the Month challenge.
I made another tall tag - 8"x3.3/4" approx - not as wide as the last one. I found a tall scrap of card that was half covered in yellow - not being a big fan of too much yellow, I wanted to change it somehow, so I took out my TH 3D bricks embossing folder and ran it through my machine. I love the depth of the embossing in the 3D folders, though is it just me, or do they sometimes makes the card feel more like plastic!? I swiped some Hickory Smoke and Antique Page Distress Oxides on the folder then spritzed them with water once it was embossed. I spritzed the sponged Oxide inks above the wall, then stamped with a few little 'filler stamps' from my stash.
The cat (and the great words) are from Katzelcraft. I stamped the cat over the embossed wall, then on a smaller piece of card, fussy cutting and colouring before attaching to the tag. I wasn't sure where to put the words, and was thinking of using a set of Signpost stamps I have, but none of them were big enough, so I drew one, coloured and cut out. Oops came from my alphabet stash. I die cut the grass before mounting it all onto a piece of black card and creating a hole with my star punch.
This one was a trial with another 3D embossing folder. It needed more colour because the inks I'd swiped across the inside of the folder were only sparse, so I spritzed with a home made reinker spray (Oxide), then lots of water, but I kept on and on adding water and painting a little of the colour onto the design. When it was dry, I painted some bits of the swirls with Deco Foil Transfer, let it dry, then applied some gold leaf. 
I added Victorian Velvet  and Bundled Sage Oxides to the flowers and stems, then attached to the card front with the words. Although I loved the result, in my mind I could 'see' text here and there, so I added the text stamping after fixing the front to the card. Love the imperfection of the Gold leaf. That's exactly what I was aiming for 😉


Linking to:-
Paper Minutes, Dog or Cat
Day of the Month Card Club, Frog Jumping Day
Sweet Stampers, Animals/Birds
Simply Create, Too, Use Flowers

Thanks for calling in today
Back soon
Stay safe!
Cath
xxx

Monday 18 May 2020

It's Monday, so that means...
and today, the challenge is
We're All A-Buzz
For my third week in the Designer Spotlight, this is what I made.
and the vouchers are BACK!
Join the challenge for a chance to win a $25 voucher from Simon Says Stamp!
(they have an amazing variety of products 😊)

This is another card that was loads of fun to make, although it seems a long time since I made it because it was back in March 😊

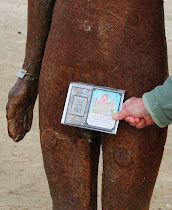
I began by cutting two squares of white card, 5.5", and die cutting the honeycomb in the corners of one of them, using Tim Holtz Mixed Media Thinlits

Random 'bee' and 'buzz' dictionary definitions were cut out and stuck in place before using a credit card to randomly add Gesso over it.
Sponged and smooshed Distress Inks - Dried Marigold and Wild Honey - added the colour and the Gesso adds the variation in shade. (I used Distress Inks rather than Oxides because I wanted deeper shades of the colours I was using, especially the Rusty Hinge ink.) An Aall and Create background, stamped in Rusty Hinge, adds a bit more interest.

I sponged Wild Honey in the corners of the card I didn't die cut, flicking some water on it for some colour variation. 
Lightly dragging Rusty Hinge Distress Ink over the die cut corners, then spritzing with water, gave them a little more definition. I then spattered some Rusty Hinge ink all over the card. 
Applying PVA - for a firm hold - onto the Wild Honey corners with my fingers, I attached the top piece of card. I was pleasantly surprised that the glue gave it a nice varnished look, deepening the colour and making it look a little bit more realistic. (Note to self: Must remember this for future use - as if I will 😉)
I stamped the bees (Pink Ink; Bee-utiful). onto scraps of card, stamping the larger one twice, then coloured with pencils and fussy cut. Stamping the larger one directly onto the card and embossing with clear EP gave me all those lovely swirls and the antennae. Cutting out the wings separately, I layered them, popping them up on foam squares, so that they looked a little more realistic. Nuvo Crystal drops (applied with fingerD) over the wings makes them look as if they're reflecting the light.

The 'Bee' word is from the Pink Ink stamp set and 'Just Beecause' is from a Honey Bee set - 'Hi Honey'. There are some great bee words on it. Both are stamped in Versafine Onyx Black and clear embossed.
Finally, I mounted it all onto a rich shade of brown Bazzill card.
I really love the way this turned out.

Supplies from Simon Says Stamp


Linking to
Get Creative Challenges, Make it Sparkly
Allsorts, Anything Goes
Friendship Challenge, Anything that can fly
Simon Says Stamp Wednesdays, Animal(?!) Fun

Thanks for calling in today
Back soon
Stay safe!
Cath
xxx

Sunday 17 May 2020

Yesterday, I was talking about the new, larger tags I'm seeing around lately and how much I like them...so we decided to do a tag challenge on KCUK. This is my playtime from this morning. I may well be doing more in the coming weeks...it's far from perfect but it makes me smile, so I hope it does you 😊
I used Distress Inks - Cracked Pistachio and Shaded Lilac, with a little Tumbled Glass for the water area, then Wilted Violet Oxide for the stars. I quite like this format, though it's a lot of space to fill 😉 I used the width of an A4 card, approx 8 1/4" x 3 3/4".

Linking to:
Not Just Cards, Anything Goes
A Place to Start, Custom Background

Thanks for calling in... 
Back soon
Stay safe!
Cath
xxx

Friday 15 May 2020

Good morning, peeps!
Just popping in to share my playtimes from the last couple of days.

Firstly, I just had to use this word background stamp because I think it's brilliant 😁 
I finally decided to get some more Gesso because I'd been playing with the thickened remains of a pot I'd had for years. 
Leandra from Paperartsy showed us how to use Gesso as a background element at a Katy's Corner Stamp Camp, when Distress Inks were first introduced. So, using an old credit card, I added some to this piece of card, then added Picked Raspberry and Fossilised Amber Oxides over it. I love the randomness of colour the gesso creates. After drying, I stamped and clear embossed the words. I thought this gorgeous Stampendous butterfly would work well over it, so I stamped and embossed it over the words, painting with some very watered down gesso, just to 'knock back' the colour, even though very little of it would be visible when it was finished. I used foam tape to add the stamped and die cut butterfly, then cut out and added some of the words from the background stamp.
I've been playing with backgrounds a lot lately and this was one I'd made with Peacock Feather, and Twisted Citron Oxides, plus lots of water. I wanted to bring out the colours, and take the focus off the yellowy, dingy tones these two inks can make when they blend, so I played around with it, stamping in the same two colours. as usual, but it was still a bit dark. So I added some stamping in white, to lighten it. I'm always amazed at how much a little bit of white can change the whole tone. The white circle was an afterthought, added with the help of one of my favourite stencils. 
This is the photo...
...and this is the scan - which shows the Twisted Citron a bit more.
I love the shape of this flower and the fact that it isn't a flat image, so to enhance that a little, I used foam tape to stick the central one down. I definitely have 'a thing' about foam tape at the moment 😀 I added some dewdrops with Nuvo Crystal Drops and some Liquid Pearls to the flower centres, with some Posca pen dots.
This one is the result of a playtime with Neocolor watercolour crayons on a tall, slim scrap of card. It began with just scribbling blocks of colour, stencilling with a baby wipe, then adding some background words, stencilling the tree, and the words to finish it off.

Linking to
Make My Monday, Tone on Tone
Allsorts, Anything Goes
Dare2bArtzy Challenge, In the Garden
International Art and Soul, Flowers and Butterflies
Friendship Challenge, Anything that can fly
A Place to Start, Create a Custom Background

Thanks for calling in today
Stay safe!
Back soon
Cath
xxx

Monday 11 May 2020


It's week two of my
for
Simon Says Stamp Monday Challenge 
and the new challenge is
'It's a Dog's Life'
I couldn't think of any better way to celebrate our four-legged friends than to use the Tim Holtz Crazy Dogs stamps and dies. They are so much fun! 
In fact, I would go as far as to say that the Tim Holtz Crazy Birds and Crazy Dogs changed my stamping style completely, bringing more humour and fun into my playtimes. I now have a nice collection of humorous stamps and really enjoy using them to bring a smile to people's faces.
Because I wanted a backdrop for my doggies, I began by using an embossing folder.( Unfortunately, there's no brand name on it, but any embossing folder would work well), leaving a bit of space at the bottom unembossed.
A little colour was added by lightly swiping Weathered Wood and Antique Linen Distress Inks over a craft mat, spritzing with a little water, then smooshing the embossed card through it. It needed a 'ground', so I added some grass to the plain bottom of the card, using an ink blender with Mowed Lawn Distress Oxide and a grass stencil.

The thing I love most about dogs is their desire to please their owners, so these little cuties are trying to please by giving one of their biggest treasures - a bone 😉
(I can't tell you how many times my dog used to drop a very mucky bone at my feet - and often one he'd just dug up from where he'd buried it in the garden!)

Having stamped, coloured (using Copics) and die cut the dogs, the bowl and the bone, trimming off some of the edges as required, I edged each one with permanent black pen, to add definition.  
After wrapping a scrap of ribbon around the bone, I fixed it in place in the dog bowl. 
I stuck everything down with Tacky Gluefoam squares and tape, doubling up on the bits that were at the front.

I needed a greeting, so I chose 'You Rock' from the Aall and Create Rocking Corns stamp set. I embossed it with White Embossing Powder onto a die cut label, which I attached with Tim Holtz Idea-ology Mini Fasteners

Finally, I mounted the front onto black card, mounted over green and attached to the white base card.
Just to make the dogs more 'cool', I die cut some glasses and attached them with foam tape 😊
It's a great card for a boy or a man and they can be so difficult to make.
Please do join us at Simon Says Stamp Monday Challenge this week. 
You have until 1pm (GMT) UK time on Monday 18th May to add your link. 

Supplies - all available from


Linking to:-
Challenge Up Your Life - Animals
Fab'n'Funky, Cute Critters

If you made it this far, thank you so much for sticking with it and for calling in today...
Back soon
Stay safe!
Cath
xxx

Saturday 9 May 2020

Bright colours can be mood changing - well, I think so 😊 at least - but sometimes the colours we use reflect our moods, don't you think? 
So I thought I'd play with some...
I just added Oxides to a piece of card, splattered and dripped water, then stamped and clear embossed over them. Stamping again on white cardstock, I fussy cut the image, then adhered it over the stamped one. The letters were added in my stamping platform, though I had to add some with a black Posca pen because they wouldn't stamp over the card I'd stuck on!  Words are from another typewriter stamp set with some great words.

This is my 'go to' image for conquering 'adversity' at the moment. I just think the idea of standing on the problem - the whale (think Jonah) - is super symbolic. Just remember, everyone - this WILL PASS!
It's for a friend who's having a really difficult time right now, so I just wanted to encourage her.
LOVE this Inkylicious background stamp and here, I used it a little like a gelli plate, blending bits of Peacock Feather and Salty Ocean onto the stamp. 

Linking to:
Allsorts, Anything Goes
Daring Cardmakers, Inky Backgrounds

Thank you for calling in
Back soon
Stay safe!
Cath
xxx

Wednesday 6 May 2020

Good morning!
Allsorts and Paper Minutes both have a Butterfly challenge at the moment, so I thought I'd play with my favourite butterfly stamp, small though it may be.

I played with some Oxide colours I haven't really used together and some I haven't touched in a while. I think I'm getting excited at the thought of new Distress colours to play with - how sad am I? But there's nothing like being inspired by new possibilities :-) 
So on this one I used Dusty Concord, Pumice Stone (for the leaves behind the flowers) and Mulled Wine. I used a mixture of sponging and smooshing on the background. The text stamp is one of my oldest Hero Arts word background stamps that I pull out to play with every so often.
 Blue Oxide shades came next... so I used Blueprint Sketch, Shaded Lilac and a smattering of Wilted Violet. The background is random bits of an Aall and Create stamp, a Time to Stamp prototype stamp and random stencilling with Aall and Create's Lotza Dots. The TH bloom is coloured with inks and alcohol ink Prisma pencils. I found the 'One day at a time' on my desk, but I have a feeling it had fallen off a card from one of the lovely ladies on KCUK. I just thought it would be perfect for now, this very moment in time.

This started life as a stencil clean off sheet, to which I added a bit more smooshing with Seedless Preserve and Weathered Wood Oxides. The stamps are Lavinia, and were stamped multiple times with different colours - sometimes spritzed with water - including some Blueprint Sketch. I overstamped some of them with Versamark and clear embossed them to make them stand out a bit more.
Linking to:-
Retro Rubber, Use flowers (Hero Arts stamp about 15 years old, flowers over a year)
A Place to Start, Create a Custom Background
Dare2BArtzy, In the Garden
Stamping Sensations, Say it with Flowers

That's it for today
Thank you for calling in and stay safe, everyone!
Back soon
Cath
xxx

Monday 4 May 2020

I'm really honoured to have been invited to create for the Designer Spotlight for Simon Says Stamp Monday Challenge during the month of May. 
I'm 'chuffed' to be a small part of one of my favourite challenges.
So, without further ado, today is Monday and that means...


SPRITZ and SPLATTER
featuring PAPERARTSY STAMPS

I love Paperartsy stamps, and especially Zinski Art, so these stamps were a delight to play with 😁

When I looked at the images, I decided they would make the perfect card for my younger son's birthday. He's a bit of a party animal - loves a reason to celebrate with his friends - and because these little peeps look as if they're in Fancy Dress, I decided to go with that idea. I knew his little girl would love them, too.

I started by sponging my favourite colour combination of Distress Oxides - Peacock Feather, Salty Ocean and Wilted Violet - onto a piece of 6x6 white card, which was then spritzed and sprayed with water, tilting so the inks merged more and blotting off with kitchen towel until I achieved that wonderful variegated oxidised effect I love so much. 

It was fun stamping, colouring (with soft pencils) and fussy cutting the mice from Zinski Art 44 and 45. These images are just so much fun to play with 😆 because they are such happy little creatures. (The small bird on a signpost stamp is from one of Paperartsy's very early stamp sets.) Once arranged on my card I thought about how to create a scene with them. 

Having decided they would all be arriving for my son's usual, annual celebration, I added a bit more Peacock Feather ink to the base of the card, just for differentiation, then stamped the 'ground' and the side edges with Ellen Vargo Eclectica3 stamps, using Versafine Onyx Black ink and Clear embossing powder.

Next, I edged each fussy cut character with a thick permanent black ink marker, then glued them in place. A little definition was added around the images by picking up some smooshed Peacock Feather ink with a paintbrush. 

 
(Love the little guy flying in by balloon power 😉)

Having found a tiny 'Happy Birthday' stamp for the signpost, I then needed some party words, so I decided to use die cut lettering for the word Party and found a 'Let's' stamp in my stash. 

All that remained was to splatter the whole card with 'confetti', so I added a little of each matching colour of Dylusions Paint to my glass mat, then splattered with my trusty fan brush.

I hope you'll join the Challenge Fun!
You have until Monday 8am, Ohio time, 1pm UK time, and 2pm CET to add your link.
You can also join in on Instagram.

Supply List

Linking to 

Thank you for calling in today - it's a pleasure to have you here.
God bless you and keep you safe in this very strange time
Till next time...
Cath
xxx